How do I use the My List feature on MusicplayOnline?
The My List feature is an excellent tool to organize the resources on MusicplayOnline into a lesson for your class. Learn how to create a new list, edit a list, share a list, and add additional resources that aren't on MusicplayOnline to your list.
Create A New List
- Log onto MusicplayOnline.

- Select My Lists on Left Menu.
- Next to the title click on "Add New+."
- Give your list a title, select the language of instruction and any relevant categorization options options.
- Scroll down and click on "Add List" to create your list.
Copy an Existing Learning Module

- Go to the learning module that you would like to copy.
- To the right of the Learning Module's title you will see a white button "More Actions" button.
- Click on "More Actions" and then in the dropdown click "Clone."
- You will be redirected to your copy of the learning module.
Please Note:
My Lists are unique to your account so any edits you do will not change or affect the original learning module.
Adding Resources to your List
- Go to the resource you would like to add to your list (a song, game, activity, video, etc.)

- Click on "+ Add To My List"
- A list of your current My Lists will appear. Select the list you would like to add it to.
- Add some teaching notes here (these can be edited later)
- Click on "Add to List"
- To close the list click on the yellow button " Add to My List" again.
Editing a List
- Select My Lists on Left Menu.
- Click on the list you would like to edit.
- Next to the list's title you will see a "More Actions" button that will reveal the Share, Edit Info, Clone and Delete actions for that list.

- For every activity there are five options:
- The pencil flips the activity into editing mode where you can edit the activity's name and teaching description.
- The up arrow will move the activity up one activity.
- The down arrow will move the activity down on activity.
- The trash can will delete the activity from your list.
- The Add to My List button lets you add that procedure to another of your lists.
Add an external link, PDF, JPEG, etc.
- Scroll down to the bottom of your list and click on the button that says "+ Add Procedure."
- Fill in the Title of your activity in the box titled "Title."
- Paste the URL in the box titled "Link URL."
- Write the text you would like to appear on the button in the box titled "Link Text."
- Write any teaching notes you would like to appear in the activity in the box titled "Teaching Notes."
Pro Tip!
Upload a file to your LMS and paste it into the "Link URL" box to give students access to a worksheet. You can do this with any file as long as you can link to it and students can access the linked file.
Sharing Lists
You can share your Lists with with your students or with other teachers! Lists have a 'Visibility' setting which can be set when being created or when editing the details of a list.

The private setting allows you to share your list with ONLY your students using your student code. Anyone trying to access the list from a different account will get a 404 error page.
The shareable setting allows anyone with an account to view the list via a link. This includes both other teachers with their account and any student code, not just yours.
Bulk Actions for Lists
You can take bulk actions for your MyLists. This includes Deleting, Marking as Private or Public, and Archiving the lists.
To use the bulk actions, you can select the lists you wish to edit using the check boxes on the left side as shown here:

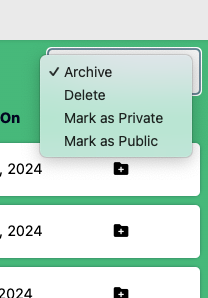
Once you have selected the lists you wish to edit, you can click the Edit dropdown in the top right to take one of the following actions:

- Archive: This moves the list to the archive view
-Delete: This will permanently delete the selected lists.
- Mark as Private: Set the Privacy setting on all the selected lists as Private to me and My Students
- Mark as Public: Sets the privacy setting to Shareable to anyone with an active teacher license
Please use caution when bulk deleting lists, as once they have been deleted they cannot be restored.
Archiving MyLists
If your MyList section is starting to feel cluttered, but you don't want to delete any lists, you can now add lists to an archived view. Archived lists do not appear in the main view of your lists, and can only be viewed by selecting Archived lists in the View dropdown here:


To Archive a list, you can use the Bulk actions (as described above). You can also archive a list by editing the Visibility setting when editing an individual List.
